|
 |
|
|
|
|
| Latest
Update December 7, 2011 - New entries will appear on this page. Links to
earlier episodes, see right column.
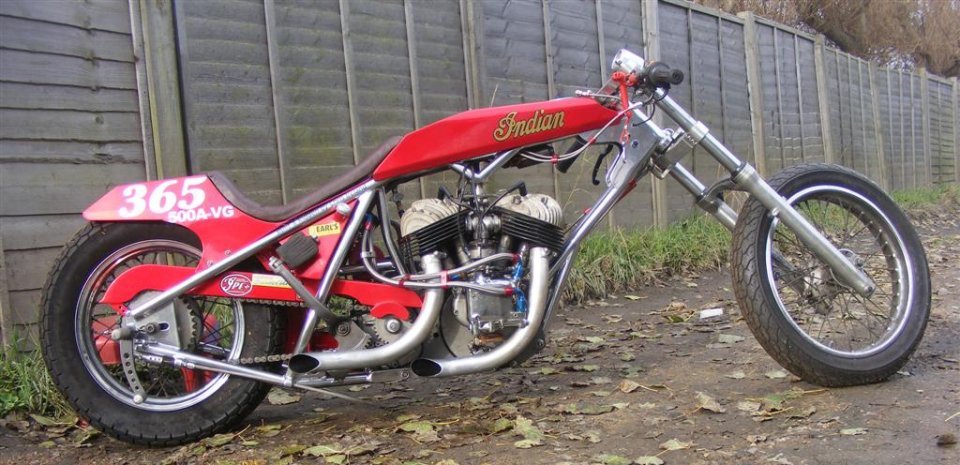
Bonneville, part 3 Its like Christmas
when your powder coating is ready. Id decided on no chrome as I live 100
yards from the salty sea. Aerocoat are in my opinion the BEST powder coaters
in the UK, and specialise in bikes, unlike most companies who do them as
a sideline. Their pallet of colours is amazing, everything from plain black
to metalflake. Yes, you read right, they can do metalflake in a powder
finish.
The forks are from a Suzuki GS850, the wheels Honda Shadow, so Roy at Billet Bike Bits made me a new set of yokes ½ wider, & even CNCd Brit Chopper into the top one.
I had been waiting for a rear sprocket, as the Shadow one had far too many teeth. This arrived in the form of a 36 tooth duralumin blank, so a day was spent machining it to fit the Honda wheel.
I worked out the ratios and with the 36 tooth rear and a huge 26 tooth (IPE) gearbox sprocket (check out the picture) I should be able to run @130mph at 5,000 rpm, just enough to get the record Im after, if I can get her up to 5,000 on the salt.
The petrol and oil tanks were coated internally with POR 15 tank sealer. I do this for two reasons. Firstly to fill any porous welds, and secondly to lock in any grinding dust stuck in the corners. Putting this bike together was a pleasure. Im used to building choppers & trikes, so every nut and bolt on this bike is stainless steel. I used the tried and tested method to fit the engine and box, laid them on the floor and put the frame over. It went in without a single scratch. One thing to bear in mind when opting for powder coating, is the thickness of the stuff. There are something like 5 separate coats to do a decent job, even more for the chrome effect. I had put in extra washers to allow for this during the dry build so everything fitted, the only thing I had to file out being the rear axle slots.
With the bike on wheels (it took less than a day) it was time to make it look pretty. Even though its going to Bonneville, it can still look good. I had managed to find a digital rev counter, something that wasnt easy to find for a twin cylinder machine, so the best part of a day was spent machining a housing from a block of solid aluminium.
The wires run through an Earl's brake hose, its a neat finishing touch. The throttle cables and advance/retard cable also run through Earl's brake lines, using Venhill nylon inner tubing, which fits inside the braided hose perfectly. This took a while as I had to machine up special end fittings.
All the oil lines and breathers are also from Earl's. The engine and oil tank breathers go into a cylindrical catch tank.
Wiring was pretty simple. Im using an IPE electronic ignition, with a coil from a Yamaha XS 750 triple. These coils are ideal because for a start theyre of the correct ohm range for the ignition, theyre compact, have two threads cast in so mountings easy, and finally, the plug lead unscrews, so its easy to extend it if needed. The other ignition components I used were an on-off switch & warning light fitted in the frame gusset, a safety lanyard, and a kill switch in the twistgrip, these being compulsory for the Flats, plus the rev counter. Wow, the spark from the IPE ignition is amazing, you can hear it crack!!
The last part to fit was the carb. Mines a huge thing off a Harley Sportster with an accelerator pump [Keihin CV], bolted to yet another superb part from Moen, a cast aluminium IPE inlet manifold, and he insisted I fit an IPE top on it instead of the original plastic cap. Last to go on were the sponsors' decals, plus the Indian ones I had a local sign firm make, and to finish her off, her name, Bella on the front of the tank.
Now its time to fill it with oil and petrol. It was no surprise when she fired up second kick and after some fiddling with the carb she ticks over so slowly you can almost count the bangs. So whats next? Id decided to run it with no front brake at Bonneville, but I need to test it over here, hopefully at a local drag strip, so its going to have to have a brake. Im looking for an early Japanese wheel with a twin leading shoe drum, and spokes, to keep the period look. I think the old Yamaha RD250s had them, so its back to eBay for that. And Ill wrap those pipes. One of the biggest problems I have, is testing and setting up the bike. Bonneville is 4,000ft above sea level for a start, and you get a 2 mile run-up to the measured mile, which is great if you live in Utah, but not so good if you live in the UK, although theres an 8 mile straight not far from me here in Norfolk, but with the latest Police Seize and Destroy policy for naughty drivers, going that route on an out & out unsilenced race bike is not a good idea.
Theres one last job to do on her now, and thats a full engine rebuild. I wanted to build the bike first to give me the enthusiasm to tackle the motor, as I know theres something not quite right inside. As usual, Ill be doing as much as I can myself, and after chatting to Moen, were going to do a step by step feature, with photographs, of every aspect of stripping and rebuilding a 741 on a right tight budget. There will also be at least one more follow-up article before we go to Bonneville. So stay tuned! THANKS TO EVERYONE WHO HELPED MOEN at Indian Parts
Europe for parts and advice.
There are people Im bound to have missed, to everyone I say thank you, without your help this would never have been built.
|
Part
1 here Part 2 here
This is the story of Chris Ireland's 741 Land Speed racer. A race bike built on a shoe-string
budget by sheer
For more information, or offers of help or sponsorship, contact Chris on desperate@britchopper.co.uk
____________________ Sponsors
____________________ Background
Chris is the editor of Brit
Chopper Magazine,
____________________
|
|
|
|